N.B. This web page is only intended to help you work on your stove, but I don't take any responsibility for any damage or injuries which result.
First-off, make sure yours is the Mark 2 version - it should have rectangular hot-plate covers.
If not, this page is not going to be of much help.
Secondly, check if there's an alternative fix instead of replacing the controller:
If that works, you may wish to leave it, or just check the contacts and fitting, rather than replacing the controller, to (hopefully) ensure the problem stays away.
To check the contacts, work through the steps below, ignoring those dealing with the fitting of a new controller.
If you do need to replace the controller, choose which controller to obtain from the table below, using the guidance in the table below that.
| Stanley Brandon models spare parts manual. |
| Version |
Fuel |
Parts List on.. |
Diagram on.. |
Parts |
Available from
(with last-seen price) |
| MK3 60/80/100K models
The mark 3 has round hot-plate covers
NOT covered by this web page |
Oil |
Page 4 (PDF page 5) |
Page 5 (PDF page 6) |
131. Control Panel Glass - T00038AXX
132. Timer Unit PCB Board - G00264AXX |
PCB from
Rangemoors at £263.15
|
| Gas |
Page 6 (PDF page 7) |
Page 7 (PDF page 8) |
| MK2 60/80/100K models
The mark 3 has rectangular hot-plate covers |
Oil |
Page 8 (PDF page 8) |
Page 9 (PDF page 10) |
38. Timer - G00026BXX
134. Timer Switch Insulation - Consumable |
Harworth Heating at £200.20 incl. VAT
Rangemoors at £201.41 incl VAT
Heating Parts Warehouse at £276 incl. VAT
Heating Parts Specialists at £295.08 incl. VAT |
| Gas |
Page 10 (PDF page 11) |
Page 11 (PDF page 12) |
| Alternative part for the MK2. |
|
|
|
Honeywell ST9400C programmer |
For example,
Screwfix at £96.59 incl. VAT
A
search will find you lots of alternative suppliers |
There is an additional item shown - "Timer switch insulation - Consumable" - I'm not clear what this is since my Stanley had nothing like this in place behind the controller I replaced.
The photographs below are of my Stanley mark 2 oil-fired version.
Removing the old controller.
|
Before dismantling.
|
|
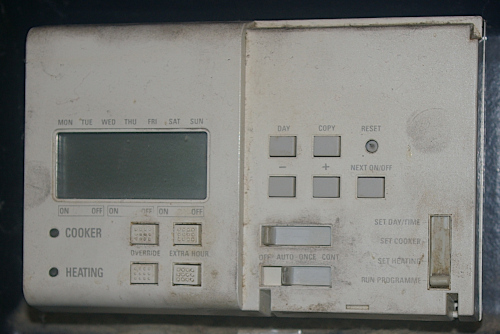
This shows the old controller with its associated controls for the boiler and oven temperatures, and the selector switch which alters the heating between "central heating" and "hot water only" modes.
If your controller and / or controls are different to this then this page may not be of use.
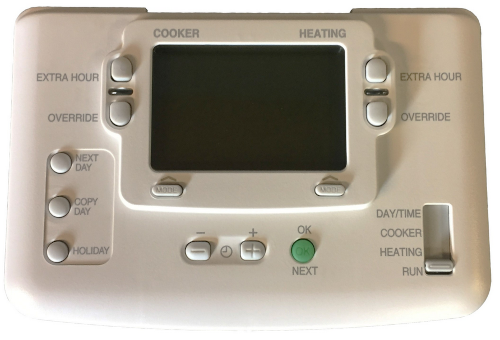
The new controller should come with these
Installation Instructions. You should read them alongside this guide.
|

|
|
To start with, you may wish to go through the current settings on the controller and make a list of the start and stop times.
It's worth having some form of camera to take record shots - one here will record the temperature settings.
|

|
Dismantling.
|
VERY IMPORTANT.
Disconnect the power from the Stanley.
Check the controller's screen goes blank.
Try the "plus an hour" buttons to make sure.
|

|
|
Pull off the temperature control knobs.
|

|
|
The controller is held in place, at the bottom, by two screws - one in the centre and one on the left.
These are awkward to get at and are easiest to access using a small flat-head screwdriver.
|

|
|
Once the bottom is loose from the screws, ease the bottom out.
Then you can push the unit upwards to disconnect it from two lugs.
|

|
|
This shows the backplate.
The two retaining screws can be seen at the bottom.
You can see where the controller makes contact, along the top.
|

|
Replacing the backplate.
This is optional since the new controller should work with the old backplate.
If you are not going to replace it, then it's a good idea to make sure all the connection screws are tight.
Then skip to the "Fitting the new controller" stage below.
|
Important
The four wires on the right are all black. Tie the right hand two together.
Take a photo at this stage to make sure you can get the wires back in the correct order.
|

|
|
Here's the new controller with the supplied backplate unclipped.
Important
Before fitting the backplate, try doing up the two bottom screws a little.
On mine, they were very stiff to start off and this is easier to sort out at this stage.
|

|
|
The old controller is held in place by two screws (each fitted with a locking washer).
Undo these and pull the controller over the wires.
You can see the raised area, on the right, where one of the screws located.
|

|
|
You will need to enlarge the holes for the screws in the backplate since they are larger than the holes.
A 5mm. drill bit does the job.
This shows the new backplate fitted, with one screw and locking washer visible.
|

|
|
Now refit the wires, making sure they are in matching slots to how they were on the old controller.
The old wires should already be soldered and suitable lengths (7mm. max.).
Where there are two wires on one slot, put one on each side of the screw.
The instructions that came with the controller makes this quite clear.
|

|
|
|
|
The new controller should fit in the reverse of taking off the old one.
The lugs at the top are a bit tricky to locate, but not impossible.
Once fully located at the top, the unit should ease down at the bottom.
Now try to do up the two screws.
It's quite tricky and you may need to ease the controller back out a little to gain access to them.
Once done up, make sure it doesn't shift if you pull it.
|

|
You will probably want to unclip the front surround.
This hinges up but fouls the Stanley's frame in an irritating manner.
Now turn the power back on.
This shows the controller in place and powered up.
If you've gone for the Honeywell controller, you'll need to re-label:
from "HOT WATER" to "COOKER"
You may also wish to print off amended versions of the Honeywell:
Easy User Guide and
Complete User Guide
|

|
Please let me know if the above helped, or if you found any mistakes or better solutions (see below).
This page last updated 24th. October 2020.
Images and text © Copyright Jim Batten, 2020.